NAVIGATION
CP Content-Part
Points
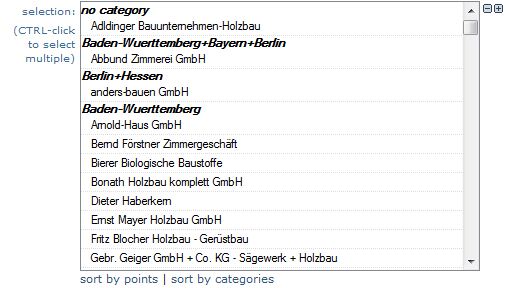
Select one or more points from the list.
The list contains all active points from the Google Maps Module section grouped by category or, when sorted by points, with their category in parenthesis.
You can sort the list by point or by category (default). Click the links below the list, it uses AJAX so there is no reload of the site!
<note>when grouped by categories the points without category will appear on top, followed by the points attached to more than one category, followed by the points attached to one category.</note>
You can extend the list by clicking on the +/- icons.
When you want more than one point in your map make a multiple selection with CTRL+click.
<note important>Selection of at least one point is required in order to get a map in frontend! Without selection here, you'll get errors in frontend!</note>
Map
Size + Position

Enter the width and height for your map. This is the total size the map will get in frontend.
Set this according to your page layout and the content within the map.
Don't worry you can change this at any time if it does not fit in frontend.
Select the position of the map in relation to the title or subtitle and the left/middle/right
arrangement.
You can align the map within the text block (left or right) as well, just like images. Note
that the text-contentpart must then be placed below/after the google-map-contentpart!
Initial setting
Plugins

Enable the Google Earth Plugin here.
The Google Earth map layer is shown via a separate GMapType that looks and
behaves like the standalone Google Earth application, allowing you to rotate perspectives,
see elevations, and view Google Earth KML information within the browser.
<note important>The plugin does NOT show the markers at the moment, we are working on this issue.</note>
Controls
Zoom

Here you can enable the zoom control in the map.
Note: we added zoom with doubleclick on default.
 | when enabled the script adds the standard zoom control depending on the map size to the left top corner of the map. (all special zoom controls from API V2 are not supported anymore) |
 | when you wish to add the pan-control (disabled on default) you can do so with additional api-script, add the following code in the API-Script fieldmap29.setOptions({ panControl: true, panControlOptions: {position: google.maps.ControlPosition.TOP_LEFT} }); change the 'map29' to the indicated object variable in your content part.\\You can set the position of the control by changing the 'TOP_LEFT' to any valid value, see here |
 | By default the streetviev control is enabled on the top left corner of the map. To disable it use additional api script like:map29.setOptions({streetViewControl: false}); |
More Controls
Two more controls can be enabled in the content part: scale (left-bottom on default) and overview (right-bottom on default).
For further behavior of these controls use additional API Script.
More Button / Layers

Panoramio and other layers are combined in the new More-Button.
On default the button appears top-right on the map and opens on mouseover.
All expressions used in the More Button can/should be translated in the language section of the module!
| Layer | Notes | added |
|---|---|---|
| Fotos (Panoramio) | You may restrict the set of photos to display on a PanoramioLayer to those matching a particular user by entering the user ID or a certain textual tag by entering additional API Script like:layers[“pano”].setTag(“tower”); | V.3.5 |
| TRAFFIC | The Google Maps API allows you to add real-time traffic information (where supported) to your maps using the TrafficLayer object. Traffic information is provided for the time at which the request is made. Consult this spreadsheet to determine traffic coverage support. | V.3.5 |
| TRANSIT | The Google Maps API allows you to display the public transit network of a city on your map using the TransitLayer object. When the Transit Layer is enabled, and the map is centered on a city that supports transit information, the map will display major transit lines as thick, colored lines. The color of the line is set based upon information from the transit line operator. Enabling the Transit Layer will alter the style of the base map to better emphasize transit routes. Transit information is only available in select locations. To see a list of cities where public transit information is currently available, please consult this list. | V.3.5 |
| BIKING | The Google Maps API allows you to add bicycle information to your maps using the BicyclingLayer object. The BicyclingLayer renders a layer of bike paths, suggested bike routes and other overlays specific to bicycling usage on top of the given map. Additionally, the layer alters the style of the base map itself to emphasize streets supporting bicycle routes and de-emphasize streets inappropriate for bicycles. | V.3.5 |
| WEATHER | You can enable the display of weather data on your map via the WeatherLayer classes of the google.maps.weather library. Enabling the weather layer will show current weather conditions from weather.com on your map, including icons that denote sun, clouds, rain and so on. Clicking on the weather icon for a particular area will open an info window with detailed data such as current humidity and wind conditions, as well as a four-day forecast. When the weather layer is enabled and the zoom level is set to 12 or lower, administrative labels, such as the names of streets or regions, will be disabled on your map. At zoom level 13 the weather layer is automatically disabled and administrative labels are restored. | V.3.5 |
| CLOUDS | You can enable the display of cloud imagery on your map via the CloudLayer classes of the google.maps.weather library. Enabling the cloud layer will add cloud coverage imagery to your map, visible at zoom levels 0 through 6. | V.3.5 |
More layers may be added in the future.
Map Styles
You can style your maps now, almost any layer can be changed to get eyecatching effects. Just follow the link in the backend and use the Styled Maps Wizard, copy+paste the JSON code to the field in the content part and enjoy your own personal map!
Marker

Activate/Deactivate the markers in the map and define whether the info window should appear in the map.
Note that info windows can only be activated with visible markers.
When you deactivate the markers, the map is still displayed with all other settings.
This can be just what you want when you want to show an empty map on your website, the
selected point will then be the initial point for the map (e.g. your address).
XML Loader
New in GoogleMaps Module V3.5!

With lots of markers the default loading of the markers can become slowly (slows down the loading of the entire page), therefore we added a xml-loader function.
 The loading of the markers starts when everything else is loaded, in the upper right corner of the map a progress-bar shows the loading progress.
<note important>requires to update the CP when change any selected point.
The xml-file the markers are loaded from is generated when the CP is saved/updated (only this way it speeds up the loading progress, if the xml-file would be written on the fly the benefit would be negligible).</note>
Marker Clustering
New in GoogleMaps Module V3.5!

The library creates and manages per-zoom-level clusters for large amounts of markers. The settings and styles can be tested here.
Sidebar
Position

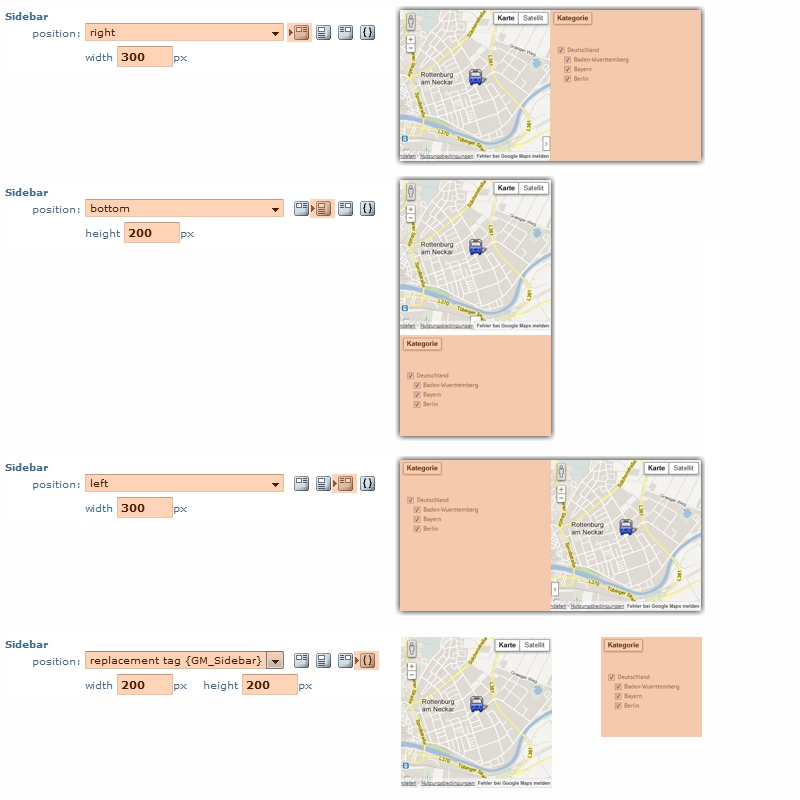
In addition to the position of the map you can place the sidebar either to the left, to the
right, at the bottom of the map or in a separate replacement tag.
Note: only with the reptag option the sidebar can be split from the map, in all other
options the sidebar and the map are stacked together.
As soon as you activate one or more tab(s) in the content part the sidebar appears in
frontent with the corresponding tabs in it.
Sidebar width should be at least 250px to display the directions result listing properly.
Within the map you'll see a new button  you can hide the sidebar and extend the
map to fullsize (map and sidebar).
<div style="float:left;overflow:hidden;" class="gm-main-container"> <div id="nnn29" style="float:left;width:500px; height:400px;position:relative;" class="GM_DivContainer"></div> <div id="gm-sidebar29" class="gm_sidebar" style="display:none;float:left; width: 300px;"> <div id="gmtab-container-29" class="gmtab-container" style="height:400px;"> <div id="gmnav-container-29" class="gmnav-container" style="height:40px;"> <ul id="gmtab-container-29-nav" class="gmtab-container-nav"> <li><a href="#">categories</a></li> <li><a href="#">directions</a></li> <li><a href="#">search</a></li> </ul> </div> <div id="gmtab-content-container-29" class="gmtab-content-container"> <div class="gmtab-29 gmtab gmtab1-content-container" id="tab1-29" style="height:360px;overflow:auto;"> <div class="gmtab-txt">Lorem ipsum dolor...</div> <div class="gmtab-categories"> <form name="myform29" action="" method="post"> <input type="checkbox" [...] /> <label for="[...]">Deutschland</label> [...] </form> </div> </div> <div class="gmtab-29 gmtab" id="tab2-29" style="height:360px;"> <div id="gmnav2-container-29" class="gmnav-sub-container" style="height:30px;"> <ul id="tab2-29-nav" class="gmnav-sub-ul"> <li><a href="#">info</a></li> <li id="li-2-2-29" style="display:none;"><a href="#">listing</a></li> <li id="li-2-3-29" style="display:none;"><a href="#">print</a></li> <li id="li-2-4-29" style="display:none;"><a href="#">clear</a></li> </ul> </div> <div style="clear:both;"></div> <div class="gmtab2-content-container" id="gmtab2-content-container-29" style="height:330px;"> <div class="gmtab2-29" id="gmtab2-txt-29" style="height:320px;overflow:auto;"> <div class="gmtab-txt">Lorem ipsum dolor...</div> </div> <div class="gmtab2-29" id="gmtab2-list-29"> <div class="gmtab-results-directions" id="gmdirections29" style="overflow:auto;height:300px;"></div> </div> </div> </div> <div class="gmtab-29 gmtab" id="tab3-29" style="height:360px;"> <div id="gmnav3-container-29" class="gmnav-sub-container" style="height:30px;"> <ul id="tab3-29-nav" class="gmnav-sub-ul"> <li><a href="#">info</a></li> <li id="li-3-2-29"><a href="#">listing</a></li> <li id="li-3-3-29" style="display:none;"><a href="#">print</a></li> <li id="li-3-4-29" style="display:none;"><a href="#">clear</a></li> </ul> </div> <div style="clear:both;"></div> <div class="gmtab3-content-container" id="gmtab3-content-container-29" style="height:330px;"> <div class="gmtab3-29" id="gmtab3-txt-29" style="height:320px;overflow:auto;"> <div class="gmtab-txt">Lorem ipsum dolor...</div> </div> <div class="gmtab3-29" id="gmtab3-list-29"> <div class="gmtab-search" id="tabform3-29"> <table width="" border="0" cellspacing="0" cellpadding="0"> <tr> <td class="gmsearchLabel">search map </td> <td class="gmsearchInput"><input type="text" [...] /></td> </tr> <tr> <td class="gmsearchLabel">address </td> <td class="gmsearchInput"><input type="text" [...] /></td> </tr> <tr> <td class="gmsearchLabel">distance </td> <td class="gmsearchSelect"> <select id="radiusSelect29" [...] "> <option value="0"></option> <option value="15">15</option> <option value="30">30</option> [...] </select> mi</td> </tr> <tr> <td> <div id="gmtab-search-wait29" style="display:none;"> <img src="include/inc_module/mod_googlemaps/img/ajax-loader.gif" width="16" height="16" border="0" alt="loding..." /> </div></td> <td class="gmsearchButton"><input type="button" [...] /></td> </tr> </table> </div> <div id="gmsearch-result-29" class="gmtab-results-search" style="overflow:auto;"></div> </div> <div class="gmtab3-29" id="gmtab3-prnt-29" style=""> <div class="gmtab-prnt" id="gmPrint" style="display:none;"></div> </div> </div> </div> </div> </div> </div> </div> <div style="clear:both;"></div>
Categorize

With the module it's pretty easy to create a map that has groups of markers that are toggled by checkboxes in the sidebar.
Add categories to your points in backend (how to) and activate the tab 'categorize'. If you want just one category (or none) preselected you can tell the script by select the category.
<note>this is an AJAX feeded field - only categories assigned to the selected points will appear in the list. You'll get a warning when you try to select a hidden category (because hidden categories are NOT displayed in frontend)</note>
The text field takes text only (but you can use custom replacement tags) and will be displayed on top in the tab.
Routeplanner

With the module it's easy to let your users do route planning to/from the points in your map.
Just click 'routeplanner' in backend to activate the tab.
Apart from the info text the tab appears empty until a planning request should be displayed.
Each Info Window gets an additional line at the bottom to select either you want the directions to or from that point.

Once clicked the Info Window changes and you can enter your address.

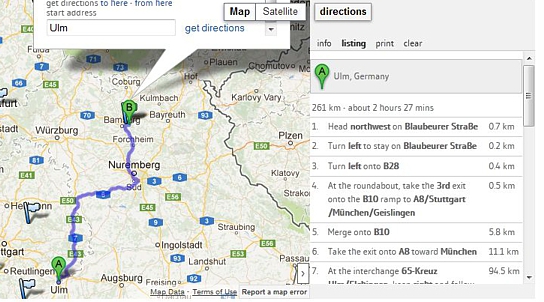
With a click on the button the script sends a request to Google and displays the result in the map (route) and in the tab (listing). If the directions-tab is not active the script changes the active tab.

Print the result list - a popup appears with the listing using this template:

within the template you can set any CSS styles or use the CSS file mentioned:
mod_googlemaps/template/css/gm_print_directions.css
The print-link in the top left corner of the popup prints out the listing, the link itself will not be printed.
Click on 'clear' to erase the list and the route in the map.
We changed the way Map Points are located. In the modules section, when adding/udating points you now enter the address of the point and the script finds the location and sets the marker at the exact coordinate in the map. the Marker can be moved later on or com from a previous version of the module, so the address is not accurate. therefore the script now does the following
- when an address and/or city is given and the address can be found the routeplanner uses these values (string) for the search
- when the address can not be found or is not stored the routeplanner uses the coordinates (latlon) for the search
- when this also returns no result a warning is displayed in the browser
Search

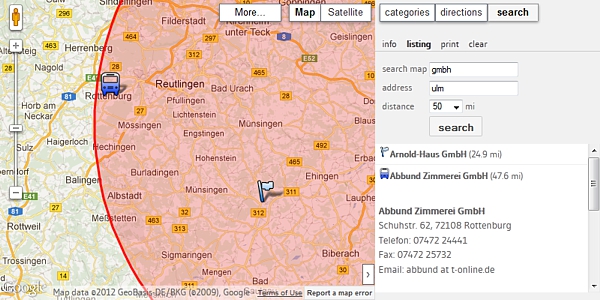
With the module it's easy to let your users do search queries based on the content and/or the address of the points in the map. Just enable 'search' in backend to activate the tab.
The tab shows a form to enter the search request. You can individually activate the fields.
The result list appears in the tab, the same dimension stuff as in directions-tab happens here.
Text Search
search the content of the points and display the point if any match is found. You can restrict the search to any combination of title/info
window/searchlisting

Location Search
search for a point at this location (1km or mile distance from the address) and display the point if any match is found.

within a distance of
Combination
Yu can do the search query with any combination of text/address/radius

New in GoogleMaps Module V3.5
You may have noticed the red circle witch marks the radius of the search within the map! Appears as soon as a location search is executed.
<note important>This internal search function searches only the points of the module! It does not search the Google-Database (Places Library)!</note>
API Console Key

The selected key is added to the API call in the header of the document where the map appears.
<script type='text/javascript' src='http://maps.google.com/maps/api/js?sensor=false&key=xyz'></script>
This has no effect to the map behaviour what so ever, it just tells Google, that the map was loaded in a browser somewhere and adds the loading to the report in the corresponding Google account.
<note important>Use only one key per page, otherwise you may violate the Google restrictions and get punished ![]() ! In case of multiple maps with diferent keys on one page, the module uses ONLY the key of the last map on the page for the API call</note>
! In case of multiple maps with diferent keys on one page, the module uses ONLY the key of the last map on the page for the API call</note>
See here for the modules admin section of the Google API Keys.
KML

Writes a kml-file (xml) containing all your selected kml-points.
Note: in case none of your selected points is a kml-point the kml file will not be created!
KML points can be displayed not only in Google Maps but also in Google Earth.
When you update the content part with your google map and the kml-option is marked, then the script writes (overwrites in future updates of the cp) a kml file to folder:
content/tmp/
<note important>this folder has changed from V3.0 to V3.5 of the module!
It's no longer the kml folder in the module because the content/tmp folder makes more sense and less work for such things.
If you Update to V3.5 you can delete the kml folder in the Googlemaps Module</note>
When the file exists the path-description becomes a link you can click in order to get a preview of your kml content in Google Earth (of course Google Earth needs to be installed on your computer).
<note important>Google no longer supports the Geo extension to the Sitemap protocol. Therefore the kml file has no other function for the moment than the ability to view the content in GoogleEarth by manually open the file. We have to find a way to tell Google about geographically-based URLs by including them in a regular Web Sitemap.</note>
additional API Script
Finally, if you need more, you can add script code to the map.
Each map created by the module will have a unique map object containing the ID number of the current content part.
You must use this ID when adding own code to the object. Same for the div-container that holds the map.
Examples
To add a KML/GeoRSS Layer to your map use:
var ctaLayer = new google.maps.KmlLayer('http://gmaps-samples.googlecode.com/svn/trunk/ggeoxml/cta.kml');
ctaLayer.setMap(map[CP_ID]);
See here for more infos to KML Layers
Structure
The structure of the rendered document is basically as follows:
<html>
<head>

...
... load all external API's
... load all js and css files from the module directory

<script type="text/javascript" charset="utf-8">
//global vars
...
var map41 = null;

function onLoad41() {

  var mapObj41 = document.getElementById("41");
  if (mapObj41 != 'undefined' && mapObj41 != null) {
    var mapOptions41 = {
      ...
    };
    mapOptions41.center = new google.maps.LatLng(
      xx.xxx,
      xx.xxx
    );
    map41 = new google.maps.Map(mapObj41,mapOptions41);

var point = new google.maps.LatLng(xx.xxx,xx.xxx);
var marker =createMarker(map41, point,"Title","HTML for info window", icon41['buspng'].image, icon41['buspng'].shadow, "", '', 237, 'Address' );
markers41.push(marker);
gmarkers41[237] = marker;
... all markers

//additional javascript

  }
}

...more javascript for google maps module

</script>

...

</head>
<body>

...

<div style="float:left;overflow:hidden;" class="gm-main-container">
  <div id="nnn41" style="float:left;width:300px; height:300px;position:relative;" class="GM_DivContainer">
    <script type="text/javascript" charset="utf-8">
    document.write('<div id="41" style="width: 300px; height: 300px; position:relative;"><\/div>');
    </script>
    <noscript>Google Maps requires Javascript</noscript>
  </div>
</div>
 <div id="gm-sidebar41" class="gm_sidebar" style="display:none;float:left; width: 300px;">
... Sidebar
 </div>
<div style="clear:both;"></div>

<script type='text/javascript'>
google.maps.event.addDomListener(window, 'load', onLoad41);
</script>

<div id="outer_more41" class="outer_more" style="display:none">
... More-Button
</div>

...

</body>
</html>


